
A bit of history (part 10) – Taking control
- ainsworthashley
- Aug 10, 2017
- 5 min read

Having the car back in my own hands was paying dividends to my self-confidence, and I was starting to deal with the small niggles that this level of modification can have on my own at last…it seemed I was losing my fears of getting my hands dirty on this project at last.
From a repeatedly cracking exhaust manifold heat shield, to a boost pipe constantly splitting…I was now happy to jump in and experiment with my own fixes instead of relying on anyone else. I was even starting to meddle with the controls behind how the car was working, and changed the charge cooler pump configuration so it ran all the time instead of just when the engine was on boost- which instantly reduced air intake temperatures.

Having now covered a couple thousand miles on the road I had cracked in the need for a more ferocious power delivery, and ordered up the next size turbine housing for the turbo, which I again had ceramic coated by Zircotec.
Then the big step- changing the turbine housing myself, this (I am ashamed to say) was the first time I really laid spanners on this project myself- and I have to admit I was pretty quickly asking myself why it had taken so long! It was just like any other car I have ever worked on, I just had to try and be a bit more careful not to damage what I’d spent a fair wad of cash on…

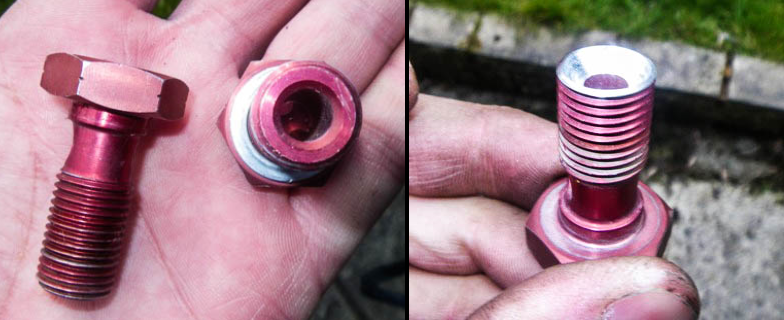
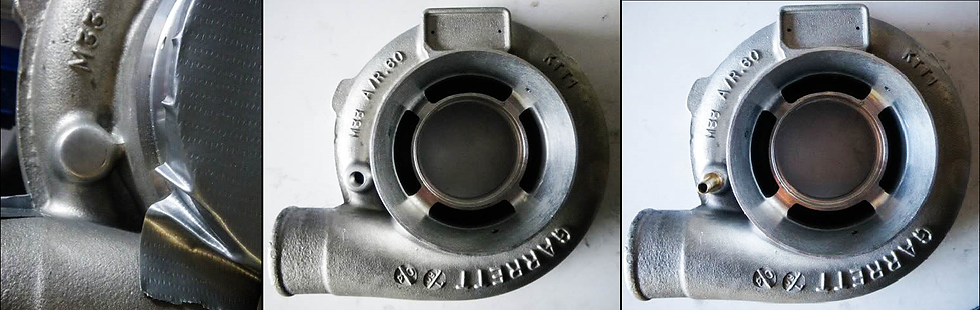
So out came the manifold and turbo, and the only mishap was a snapped stud (pretty standard!), which I ended up having to get spark eroded out of the manifold. I ported the new turbine housing to match the exhaust manifold myself this time, which was a far easier job with a die grinder than I expected.
I also (for the first time) took a proper look at how these turbos go together, and could start to see potential improvements straight away- for example the bolts that hold the compressor cover on actually protrude down into the area the inlet air flows round…now that simply cannot be good for airflow in the turbo! It wasn’t a complicated leap to trim each bolt down so they sat flush with the inside of the housing instead…
Likewise I trimmed down the banjo bolt water fittings in and out of the turbo, they just seemed to go too far in to my eye...and this was my first time using the lathe, a small first step in what was to become a long term obsession!
Another minor tweak was to change how the boost controller was working, and without reading the next bit of technical detail- I basically moved the point in the system at which the boost reference was taken from inside the inlet manifold, to the compressor cover of the turbo itself (the idea being that waste gates don’t like to see sudden change to vacuum that occur when a throttle plate is slammed closed, and you are taking the boost reference from after the throttle- i.e. in the inlet manifold).
This involved some machine work on a very expensive turbo by my own hand, which luckily all went according to plan!
[Technical aside: turbo boost control
So how do we control how much boost a turbo tries to force into our engines? Too much and the engine will blow up, too little and we won’t be smiling through lack of power.
A very quick recap- the exhaust comes out of the engines exhaust valves, into the exhaust manifold and then into the turbine housing of the turbo. It acts across the turbine wheel of the turbo before exiting the exhaust, and in doing so spins the turbine wheel.
More exhaust pressure acting across the turbine wheel equals more energy into the turbo, equals more boost pressure created on the cold side of the turbo and into the engine.
In order to limit boost we have a waste gate on the exhaust manifold that acts to release excess exhaust gas pressure, and so limiting the energy going into the turbine wheel, and hence limiting the boost pressure created by the compressor wheel.
Simple so far- but how does the waste gate know how much exhaust gas pressure to vent, and how do we control this?
In order to understand this we need to look inside the waste gate to see how it functions, an example being the Tial unit. This is basically made up of a plunger valve that moves up and down to open/ close the entrance into the gate…with the valve down the entrance is closed, and the exhaust gases all flow into the turbo.

The top of this valve stem is mounted in a sealed unit on top of the gate, with a diaphragm on top of the stem. This diaphragm moves the valve up and down depending on the pressures on each side of the sealed unit...more pressure under the diaphragm will push the valve up.
There is also a spring in the top half of the unit that normally holds the valve down, and so the gate closed, and these springs come in different strengths.
I am not going to try and give a comprehensive explanation of ALL potential strategies to control boost, rather I am going to explain how I have chosen to do it on this engine…
There is a port on each half of the sealed unit, and these are connected as follows:
The lower port (A) is connected to the inlet tract after the turbo- and so applies whatever pressure is in the inlet tract to the underside of the diaphragm.
The upper port (B) is connected to a boost control solenoid, which can switch this pipe to either atmosphere, or to the inlet tract the same way as port A is connected.

With the upper port routed to atmosphere, as boost pressure builds in the inlet tract, the pressure in the lower half of the sealed unit builds until the pressure is sufficient to overcome the spring above the diaphragm…at which point the valve will lift, and boost pressure will be limited. In this instance boost pressure is limited by the strength of the spring you have chosen to install, and in effect- this is the lowest level of boost the engine is capable of running at.
With the upper port connected to the inlet tract as well, both the upper and lower halves of the sealed unit will always see the same pressure no matter what boost pressure this is…and as such the diaphragm will not lift, keeping the waste gate valve closed and allowing as much boost as desired.
So we have a way of running minimum boost (upper port routed to atmosphere), and maximum boost (upper port routed to inlet tract)…it therefore follows that we can control the exact level of boost desired in any given situation by controlling the duty cycle to the boost control solenoid, allowing any boost level above the spring-defined minimum to be achieved.]

Whilst the exhaust manifold was out of the car I also took the opportunity to try and create a bit more room between the turbo/ exhaust and the engine bulkhead, as well as adding some of a new heat
shielding material I’d found at the Autosport show- being Teknofibra from Walkers Garage, I’ll let their website explain it to you, but I am fully sold on it where you have room for it:
http://www.teknofibra-racing.co.uk/

It was then simply a case of bolting everything back into the car, and pretty soon I was smugly sitting with a cup of tea enjoying the warm feeling of having done it myself…I knew at this stage that I would never go back: I was determined to do ALL the work I possibly could on this project going forwards…no longer would I rely on anyone else unless I absolutely had to. I have taken control of my own destiny...
Or so I thought....
Comments